If you’re searching for an easy no-bake dessert recipe, a crowd-pleasing layered cake, or a quick summer dessert idea, this delightful creation is exactly what you need. My version of this classic treat transforms simple pantry ingredients into a rich, creamy, and refreshing dessert that tastes like it came straight from a bakery—without ever turning on the oven.
This recipe combines fluffy angel food cake, smooth cheesecake pudding, tangy cream, and sweet cherry topping into one irresistible layered masterpiece. It’s the perfect balance of light texture and indulgent flavor, making it ideal for family gatherings, festive celebrations, or even a simple weekend treat.
A Fresh Take on a Classic No-Bake Dessert
This dessert is inspired by traditional layered desserts often found at potlucks and holiday tables. However, I’ve rewritten and refined the process to make it more approachable, modern, and optimized for today’s home cooks searching for quick dessert recipes, easy cheesecake desserts, and no-bake cake ideas.
What makes this dessert truly special is its versatility and simplicity. With minimal preparation and no baking required, it’s perfect for beginners and experienced cooks alike.
Why This Dessert Works So Well
The magic of this recipe lies in the combination of textures and flavors:
- Soft and airy base: Angel food cake provides a sponge-like structure that absorbs flavors beautifully
- Creamy filling: Cheesecake pudding mixed with milk and sour cream creates a rich, tangy layer
- Sweet topping: Cherry pie filling adds brightness and fruity sweetness
- Light finish: Whipped topping balances everything with a smooth, fluffy texture
Each layer complements the others, creating a dessert that is both light and satisfying.
Understanding the Ingredients (Flavor Breakdown)
Angel Food Cake – The Airy Foundation
Angel food cake is known for its light, fluffy texture. Because it contains no butter or oil, it acts like a sponge, soaking up the creamy pudding mixture without becoming heavy. This makes it ideal for layered desserts.
You can use a store-bought cake or prepare one at home—both work perfectly.
Cheesecake Pudding Mix – The Creamy Core
Instant cheesecake pudding is the shortcut ingredient that delivers rich flavor without the need for baking. When combined with milk, it thickens quickly and creates a smooth, velvety base.
Milk – The Binding Liquid
Milk helps activate the pudding mix and gives it a creamy consistency. Whole milk works best for richness, but you can use lower-fat options if preferred.
Sour Cream or Greek Yogurt – The Tangy Twist
This ingredient adds depth and a slight tang, mimicking the flavor of traditional cheesecake. Greek yogurt can be used as a healthier alternative while maintaining the same creamy texture.
Vanilla Extract – The Flavor Enhancer
Vanilla adds warmth and enhances the overall sweetness of the dessert. It ties all the flavors together beautifully.
Cherry Pie Filling – The Fruity Layer
Cherry pie filling provides a vibrant, sweet-tart contrast to the creamy layers. Its glossy texture also adds visual appeal, making the dessert look as good as it tastes.
Whipped Topping – The Light Finish
The whipped topping (such as Cool Whip) creates a smooth, airy layer that balances the richness of the pudding and cherries.
Roasted Almond Slices – Optional Crunch
Adding toasted almond slices introduces a subtle crunch and nutty flavor, elevating the dessert to a more gourmet level.
Step-by-Step Layering Philosophy
This dessert is all about layering. Each step builds flavor and texture:
- Base Layer: Soft cake cubes create the foundation
- Fruit Layer: Cherry filling adds moisture and sweetness
- Second Cake Layer: Adds structure and balance
- Cream Layer: Cheesecake pudding spreads evenly
- Top Layer: Whipped topping and cherries finish the dessert
This structured layering ensures every bite contains a perfect mix of flavors.
Pro Tips for the Best Results
- Use chilled ingredients: Helps the pudding set faster
- Cut cake evenly: Ensures consistent texture throughout
- Don’t overmix pudding: Keeps it smooth and thick
- Chill thoroughly: At least 4 hours for best flavor blending
Make-Ahead Dessert Advantage
One of the biggest benefits of this recipe is that it can be prepared in advance. In fact, it tastes even better after sitting in the refrigerator for several hours because the flavors meld together.
This makes it perfect for:
- Holiday gatherings
- Birthday parties
- Potluck dinners
- Meal prep desserts
Serving Ideas for Maximum Appeal
Serve this dessert in:
- A glass baking dish for a layered look
- Individual cups for portion control
- A trifle bowl for an elegant presentation
Pair it with:
- Coffee or tea
- Fresh fruit on the side
- A light summer meal
Creative Variations You Can Try
While this version uses cherries, you can easily customize it:
- Strawberry version: Replace cherry filling with strawberries
- Blueberry twist: Use blueberry pie filling
- Tropical style: Add pineapple and coconut
- Chocolate lovers: Add chocolate chips between layers
Storage Tips
- Keep refrigerated in an airtight container
- Best consumed within 2–3 days
- Do not freeze, as the texture may change
Why This Recipe Is a Must-Try
This dessert stands out because it is:
- Quick and easy to prepare
- No-bake and beginner-friendly
- Perfect for any occasion
- Balanced in flavor and texture
- Highly customizable
It’s the kind of recipe you’ll come back to again and again.
Final Thoughts
This no-bake cherry cheesecake angel cake is more than just a dessert—it’s a celebration of simplicity and flavor. With minimal effort, you can create something that looks impressive and tastes incredible.
Whether you’re making it for guests or just treating yourself, this recipe delivers consistent, delicious results every time.
Part 2: Simple No-Bake Cherry Angel Cake Recipe
Ingredients
- 1 prepared angel food cake
- 1 package (3.4 oz) instant cheesecake pudding mix
- 1½ cups milk
- 1 cup sour cream (or plain Greek yogurt)
- 1 teaspoon vanilla extract
- 1 can (30 oz) cherry pie filling
- 1 container (8 oz) whipped topping
- 1 tablespoon roasted almond slices (optional)
Instructions
1. Prepare the Cake
Cut the angel food cake into bite-sized cubes and set aside.
2. Make the Creamy Filling
In a bowl, whisk together pudding mix, milk, sour cream, and vanilla until smooth and thick. Set aside.
3. Layer the Base
Place half of the cake cubes into a 9×13-inch dish.
4. Add Fruit Layer
Spoon half of the cherry pie filling evenly over the cake.
5. Repeat Layers
Add remaining cake cubes on top, then pour the pudding mixture evenly over everything.
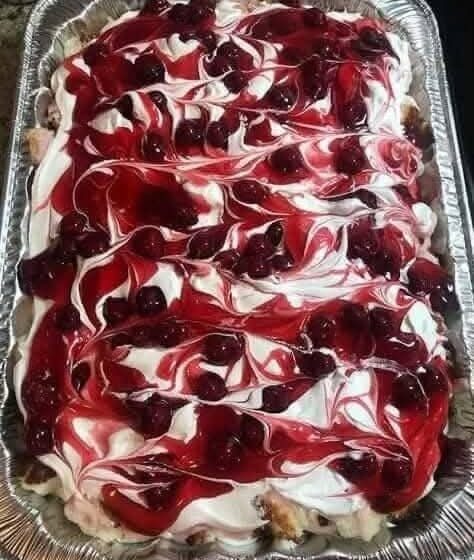
6. Top It Off
Spread whipped topping over the pudding layer. Add remaining cherry filling on top.
7. Chill and Serve
Refrigerate for at least 4 hours. Sprinkle with roasted almonds before serving if desired.
Serving Suggestions
- Serve chilled for best taste
- Garnish with extra cherries or nuts
- Perfect for parties and gatherings