If you’re looking for a simple yet elegant dessert that combines a crisp, buttery crust with a smooth, creamy filling, these classic custard bars are exactly what you need. This easy baked dessert recipe is a perfect example of how a few basic ingredients can come together to create something truly comforting and memorable.
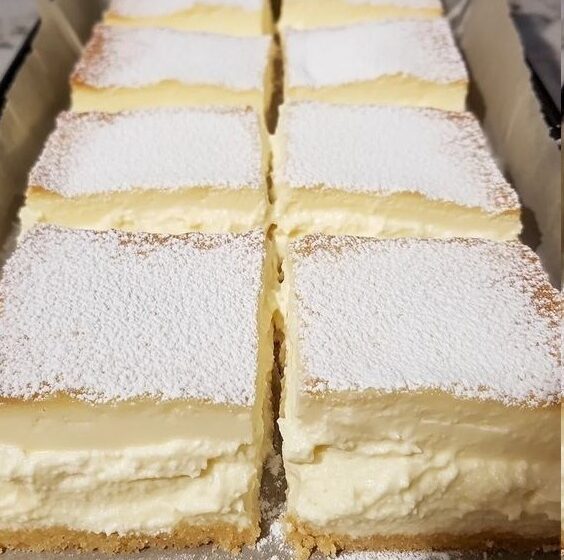
These homemade custard squares feature a tender shortbread-style base topped with a soft, lightly sweet custard layer, finished with a delicate dusting of powdered sugar. The result is a dessert that’s rich without being heavy, sweet without being overwhelming, and perfect for any occasion—from afternoon tea to festive gatherings.
Why These Custard Bars Are So Loved
There’s a reason desserts like these have stood the test of time. They are simple, reliable, and incredibly satisfying. The contrast between the slightly crisp base and the silky custard topping creates a texture that feels both indulgent and balanced.
Here’s why this recipe is a favorite:
- Minimal ingredients with maximum flavor
- Perfect balance of buttery and creamy textures
- Easy to prepare for beginners
- Great for make-ahead desserts
- Ideal for sharing and gifting
These bars are the kind of treat that feels homemade in the best possible way.
The Secret Behind the Perfect Buttery Crust
The foundation of this dessert is a simple crust made from flour, sugar, and butter. When combined correctly, it forms a crumbly mixture that bakes into a firm yet tender base.
Cold Butter Matters:
Using cold butter helps create that classic shortbread texture. As it bakes, the butter melts and forms a slightly crisp, golden layer.
Pressing the Crust Evenly:
Firmly pressing the mixture into the pan ensures the crust holds together and doesn’t crumble when sliced.
Pre-Baking Is Essential:
Baking the crust before adding the filling prevents it from becoming soggy and helps maintain structure.
Creating a Smooth and Creamy Custard Filling
The custard layer is what gives these bars their signature texture. Made with eggs, sugar, flour, baking powder, vanilla, and a pinch of salt, it forms a smooth, slightly airy topping.
Whisking Technique:
The key is to whisk the ingredients just until smooth. Overmixing can introduce too much air, affecting the texture.
Balanced Sweetness:
The combination of sugar and vanilla creates a gentle sweetness that complements the buttery base without overpowering it.
Layering for the Perfect Texture
Once the crust is partially baked, the custard mixture is poured over it and returned to the oven. As it bakes, the custard sets into a soft, creamy layer that contrasts beautifully with the base.
The goal is to achieve a filling that is set but still tender—not overly firm.
Baking Tips for Best Results
To ensure your custard bars turn out perfectly, follow these tips:
- Preheat the oven fully before baking
- Use parchment paper for easy removal
- Avoid overbaking to maintain a soft texture
- Let the bars cool completely before slicing
- Use a sharp knife for clean edges
These small details make a big difference in the final result.
Serving Ideas for Every Occasion
These custard bars are incredibly versatile and can be served in many ways:
- With hot beverages: Pair with coffee, tea, or chai
- As a dessert: Serve with fresh berries or whipped cream
- For gatherings: Arrange on a platter for easy sharing
- As gifts: Package in boxes or jars for a homemade touch
Their simple elegance makes them suitable for both casual and formal occasions.
Make-Ahead and Storage Tips
This dessert is perfect for preparing in advance:
- Store at room temperature for a few days in an airtight container
- Refrigerate for longer freshness
- Freeze without powdered sugar for extended storage
Before serving, allow them to come to room temperature for the best flavor and texture.
Customizing the Recipe
While the classic version is delicious, you can easily adapt it:
- Add a hint of almond extract for a nutty flavor
- Top with fruit for a fresh twist
- Experiment with different flavor extracts
These variations allow you to personalize the dessert without changing its core ingredients.
Common Questions About Custard Bars
Can I make them gluten-free?
Yes, use a gluten-free flour blend for both layers.
Why is my filling too firm?
It may have been overbaked—remove from oven once set.
How do I prevent a soggy crust?
Pre-bake the crust and let it cool slightly before adding filling.
Can I freeze them?
Yes, freeze without the powdered sugar and add it after thawing.
Why This Recipe Is Perfect for Home Bakers
This recipe is ideal for beginners because it uses simple techniques and ingredients. At the same time, it produces a dessert that looks and tastes professional.
A Dessert That Feels Like Home
There’s something comforting about a dessert that doesn’t rely on complicated steps or fancy ingredients. These custard bars are a reminder that simple baking can be incredibly rewarding.
Final Thoughts on These Creamy Custard Bars
This recipe is proof that classic desserts never go out of style. With a buttery crust, creamy filling, and light sweetness, these bars are perfect for any time you want a homemade treat.
Part 2: Simple Step-by-Step Recipe (Quick Version)
Ingredients
For the Filling:
- 2 large eggs
- ¾ cup granulated sugar
- 2 tbsp all-purpose flour
- ½ tsp baking powder
- 1 tsp vanilla extract
- Pinch of salt
For the Base & Topping:
- Flour
- Sugar
- Cold butter
- Powdered sugar (for dusting)
Instructions
- Preheat Oven
Set oven to 350°F (175°C). Grease or line an 8×8-inch pan. - Prepare Crust
Mix flour, sugar, and cold butter until crumbly. Press into pan and bake 15 minutes. - Make Filling
Whisk eggs and sugar until light. Add flour, baking powder, vanilla, and salt until smooth. - Bake
Pour filling over crust and bake 20–25 minutes until set. - Cool and Serve
Cool completely, dust with powdered sugar, and cut into squares.
Quick Tips
- Don’t overmix filling
- Cool fully before slicing
- Use parchment for easy removal