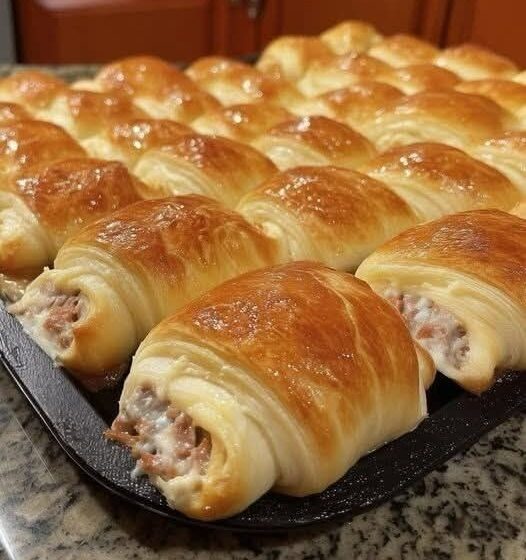
When it comes to easy appetizer recipes, quick dinner ideas, and family-friendly comfort food, few dishes can compete with the irresistible charm of cheesy chicken crescent roll-ups. These golden, flaky bites combine tender shredded chicken, creamy cheese filling, and buttery pastry into one perfectly balanced snack that works for every occasion—from casual lunches to party platters.
This recipe is not just about convenience—it’s about creating something that feels homemade, satisfying, and full of flavor without spending hours in the kitchen. Whether you’re planning a game day snack, looking for kid-friendly recipes, or simply craving something warm and cheesy, this dish delivers every single time.
Why These Chicken Crescent Roll-Ups Are So Popular
There’s a reason why this recipe consistently ranks among top searched easy chicken recipes and quick appetizers online. It checks all the boxes:
- Fast preparation (ready in under 30 minutes)
- Minimal ingredients
- Customizable flavors
- Perfect texture—crispy outside, creamy inside
The combination of flaky crescent dough and rich, cheesy filling creates a contrast that’s incredibly satisfying. Plus, the handheld size makes these roll-ups ideal for serving at gatherings, lunchboxes, or even as a quick dinner solution.
Understanding the Flavor Profile
At its core, this recipe is built on three essential components:
1. The Creamy Chicken Filling
The filling is where all the flavor lives. Shredded chicken provides a hearty, protein-rich base, while cream cheese adds smoothness and richness. Shredded cheese (like cheddar or mozzarella) brings that classic gooey texture everyone loves.
Optional seasonings—like garlic powder, onion powder, paprika, or dried herbs—can elevate the taste even further, giving the filling depth and personality.
2. The Buttery Crescent Dough
Crescent roll dough is the secret shortcut that makes this recipe so easy. It bakes into a soft, flaky crust with a slightly crisp exterior, perfectly wrapping around the creamy filling.
Using ready-made dough not only saves time but also ensures consistent results—ideal for beginners and busy cooks.
3. The Golden Finish
Brushing the roll-ups with melted butter and sprinkling seasoning (like everything bagel mix or herbs) before baking adds an extra layer of flavor and visual appeal. It transforms simple rolls into something bakery-worthy.
Step-by-Step Breakdown with Pro Techniques
Creating the Perfect Filling Texture
To achieve a smooth, spreadable consistency:
- Use softened cream cheese—this prevents lumps
- Finely shred or chop the chicken for even mixing
- Blend thoroughly until the mixture is creamy but not overly wet
If the mixture feels too thick, a small spoon of sour cream or mayonnaise can help loosen it slightly.
Shaping the Roll-Ups Like a Pro
Cutting each crescent triangle into smaller pieces allows you to create bite-sized portions—perfect for parties or snacks. When rolling:
- Start from the wider end
- Roll tightly but gently
- Keep the seam side down to prevent opening during baking
Baking for the Perfect Texture
The goal is a golden-brown exterior with a soft, melty interior:
- Bake at the recommended temperature (around 375°F / 190°C)
- Avoid overcrowding the baking tray
- Watch for even browning—edges should be crisp but not burnt
Customization Ideas (Highly Searched Variations)
One of the best things about this recipe is how adaptable it is. Here are some popular variations:
Spicy Chicken Roll-Ups
Add chopped jalapeños or a dash of hot sauce for heat.
Bacon & Cheese Version
Mix in crispy bacon bits for a smoky, savory upgrade.
Vegetarian Option
Replace chicken with sautéed mushrooms, spinach, or mashed beans.
Herb-Infused Rolls
Add fresh parsley, thyme, or rosemary for a fresh, aromatic twist.
Serving Suggestions for Every Occasion
These roll-ups are incredibly versatile:
- As an appetizer: Serve with ranch, garlic dip, or honey mustard
- As a main dish: Pair with salad, roasted vegetables, or soup
- For parties: Arrange on a platter with toothpicks
- Lunchbox idea: Pack with fruit and a dipping sauce
They’re also perfect for holiday gatherings, potlucks, and weeknight dinners.
Make-Ahead & Storage Tips
Prepare in Advance
You can assemble the roll-ups several hours ahead and refrigerate until ready to bake.
Freezing Option
Freeze unbaked roll-ups on a tray, then store in a bag. Bake directly from frozen with a few extra minutes added.
Reheating
For best results:
- Use an oven or air fryer
- Avoid microwaving (it softens the crust)
Common Mistakes to Avoid
- Overfilling the dough – can cause leaks while baking
- Using cold cream cheese – leads to uneven texture
- Not sealing properly – roll-ups may open during baking
- Overbaking – results in dry filling
Why This Recipe Works Every Time
This recipe is successful because it balances:
- Texture (crispy + creamy)
- Flavor (savory + cheesy)
- Convenience (quick + simple)
It’s the kind of dish that feels comforting, reliable, and satisfying—perfect for both beginners and experienced cooks.
The Emotional Side of Comfort Food
Simple recipes like this often become favorites not just for their taste, but for the memories they create. Whether it’s a quick snack after a long day or something you share with family and friends, these roll-ups bring people together.
Food doesn’t always need to be complex to be meaningful. Sometimes, the best meals are the ones that are easy to make and even easier to enjoy.
Part 2: Simple & Easy Cheesy Chicken Crescent Roll-Ups Recipe
Ingredients
- Shredded cooked chicken
- Shredded cheese (cheddar, mozzarella, or mix)
- Cream cheese (softened)
- Optional seasonings (garlic powder, herbs, paprika, salt, pepper)
- Crescent roll dough
Instructions
1. Prepare the Filling
In a bowl, combine shredded chicken, shredded cheese, and cream cheese. Add optional seasonings and mix until smooth and well combined.
2. Shape the Dough
Unroll the crescent dough and separate into triangles. Cut each triangle lengthwise to create smaller pieces.
3. Fill and Roll
Place a small amount of filling on the wide end of each triangle. Roll tightly toward the tip and place seam-side down on a baking tray.
4. Bake
Bake in a preheated oven at 375°F (190°C) for 12–15 minutes, or until golden brown and puffed.
5. Optional Finish
Brush with melted butter and sprinkle seasoning before baking for extra flavor.
6. Serve
Serve warm while the cheese is melted and soft. Enjoy with your favorite dipping sauce.