Introduction
Crispy Honey Garlic Chicken is a flavorful, satisfying dish that brings together tender chicken, a crisp golden coating, and a rich, glossy sauce made with honey, garlic, and savory seasonings. Inspired by popular takeout-style meals, this recipe delivers restaurant-quality results at home while remaining simple enough for everyday cooking.
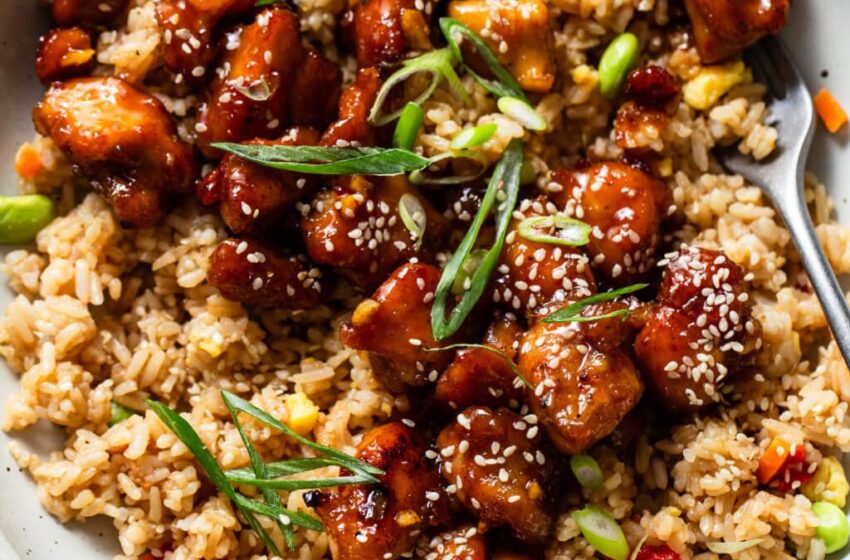
The dish features bite-sized pieces of chicken thighs that are seasoned, lightly coated in cornstarch, and pan-fried until crisp. They are then tossed in a sweet, savory, and slightly tangy sauce that clings to every piece. The result is a balanced combination of textures and flavors: crispy, juicy, sweet, garlicky, and deeply satisfying.
This recipe is ideal for weeknight meals because it comes together quickly and uses pantry-friendly ingredients. It can be served with fried rice, steamed rice, or vegetables, making it versatile and adaptable.
Ingredients
For the Chicken
- 2 lbs boneless, skinless chicken thighs, cut into bite-sized pieces
- Salt, to taste
- Freshly ground black pepper, to taste
- 2 teaspoons garlic powder
- 1 teaspoon onion powder
- 1 teaspoon smoked paprika
- 1 teaspoon sesame oil
- ¼ cup cornstarch
For Cooking
- 2–3 tablespoons vegetable oil (or canola oil)
For the Sauce
- ½ cup honey
- ¼ cup sweet chili sauce
- ¼ cup soy sauce
- 10 cloves garlic, roughly chopped
Optional for Serving
- Fried rice or steamed jasmine rice
- Sesame seeds
- Sliced scallions
Equipment
- Large mixing bowl or resealable bag
- Measuring cups and spoons
- Large skillet or frying pan
- Tongs or spatula
- Knife and cutting board
Preparation Overview
The cooking process can be divided into four main stages:
- Seasoning and marinating the chicken
- Coating the chicken with cornstarch
- Pan-frying until crispy
- Preparing and combining with the sauce
Each step contributes to the final texture and flavor, so following them carefully will give the best results.
Step-by-Step Instructions
Step 1: Prepare and Season the Chicken
Place the chicken pieces into a large bowl or resealable plastic bag. Add salt, black pepper, garlic powder, onion powder, smoked paprika, and sesame oil.
Mix thoroughly to ensure all pieces are evenly coated. The sesame oil adds a subtle nutty aroma, while the spices build a base layer of flavor.
Cover the bowl or seal the bag and refrigerate for at least 1 hour. For deeper flavor, marinate up to 24 hours.
Step 2: Coat with Cornstarch
Remove the marinated chicken from the refrigerator. Add the cornstarch and mix well until each piece is lightly coated.
The cornstarch plays an important role by forming a thin outer layer that becomes crisp during frying.
Let the coated chicken rest at room temperature for about 20 minutes. This helps the coating adhere better and promotes even cooking.
Step 3: Heat the Oil
Place a large skillet over medium-high heat and add 2 tablespoons of oil. Allow the oil to heat until it shimmers but does not smoke.
Proper oil temperature is essential. If the oil is too cool, the chicken will absorb excess oil and become soggy. If too hot, the coating may burn before the chicken cooks through.
Step 4: Cook the Chicken in Batches
Add the chicken pieces to the skillet in a single layer, working in batches to avoid overcrowding.
Cook each batch for about 3 to 4 minutes on the first side without moving the pieces too much. This allows a golden crust to form.
Flip the chicken and cook for another 2 to 3 minutes until both sides are crisp and fully cooked.
Transfer the cooked chicken to a plate and repeat with remaining batches, adding more oil if needed.
Once all chicken is cooked, return it to the skillet.
Step 5: Prepare the Sauce
Reduce the heat to medium. Add the honey, sweet chili sauce, soy sauce, and chopped garlic directly to the skillet with the chicken.
Stir gently to combine all ingredients. The honey provides sweetness, the soy sauce adds depth and saltiness, and the chili sauce contributes mild heat and tang.
Step 6: Simmer and Thicken
Allow the mixture to simmer for about 4 to 5 minutes. Stir occasionally so the sauce coats the chicken evenly.
As it cooks, the sauce will thicken slightly and develop a glossy texture that clings to the crispy coating.
Avoid overcooking at this stage, as the sauce may become too thick or begin to burn due to the sugar content.
Step 7: Final Assembly and Serving
Remove the skillet from heat once the chicken is fully coated and the sauce has thickened.
Serve immediately over fried rice, jasmine rice, or alongside vegetables.
If desired, garnish with sesame seeds and sliced scallions for added texture and freshness.
Tips for Best Results
- Use chicken thighs instead of chicken breast for better flavor and juiciness.
- Do not overcrowd the pan while frying, as this reduces crispiness.
- Allow the chicken to rest after coating with cornstarch to improve texture.
- Keep the heat controlled when adding the sauce to prevent burning.
- Serve immediately to maintain crispiness.
Variations
- Substitute chicken breast if a leaner option is preferred.
- Use coconut aminos instead of soy sauce for a soy-free version.
- Add red chili flakes or hot sauce for extra heat.
- Include vegetables such as bell peppers or broccoli for a more complete meal.
Storage and Reheating
Store leftovers in an airtight container in the refrigerator for up to 3 days.
To reheat, use a pan over medium heat for best results. Avoid microwaving if possible, as it may soften the crispy texture.
Serving Suggestions
This dish pairs well with:
- Fried rice
- Steamed jasmine rice
- Noodles
- Stir-fried vegetables


